


Embarking on a motorcycle restoration project can be an exhilarating and fulfilling venture. Whether you are a seasoned mechanic or a new enthusiast, restoring a motorcycle in your garage offers a unique opportunity to breathe new life into a classic machine. It requires a blend of patience, skill, and a passion for two-wheeled history, making it a rewarding endeavor.
Before diving into your restoration journey, it’s crucial to understand the scope of your project. Are you looking to fully restore a vintage bike to its original glory, or are you aiming for a custom build that reflects your personal style? Each approach presents its own challenges and requires different resources and knowledge. Clarity on your goals will guide you through the various stages of the restoration process.
As you prepare to tackle the project, consider the tools you will need and the space available in your garage. A well-organized workspace equipped with the right tools can significantly improve your efficiency and enjoyment during the restoration. From basic hand tools to specific motorcycle restoration equipment, setting up your garage for success will ensure that you’re ready to face the challenges ahead. This article will walk you through the essential steps to kickstart your motorcycle restoration project, providing tips and insights to help you achieve the results you desire.
Assessing the Condition of Your Motorcycle: Tips for a Thorough Inspection
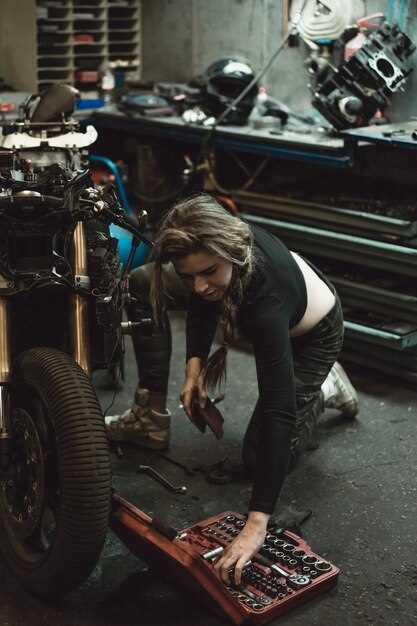
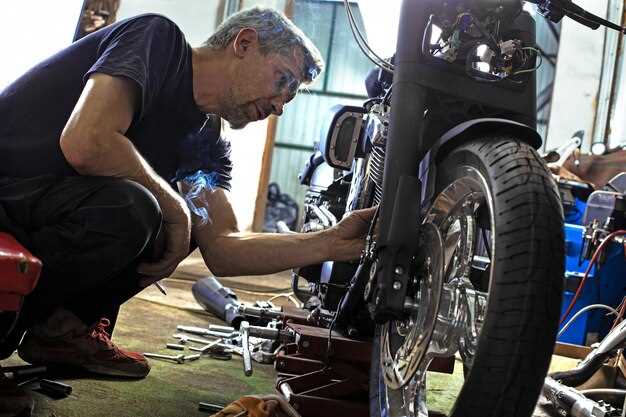
Before you embark on your restoration project, it is crucial to assess the condition of your motorcycle comprehensively. A thorough inspection can help you identify the necessary repairs, parts that need replacement, and overall feasibility of the project. First and foremost, ensure that you have a clean and organized garage space to work in, allowing for ease of movement and access to tools.
Begin by examining the body and frame of the motorcycle. Look for any signs of rust, dents, or cracks that may compromise structural integrity. Pay close attention to welds and joints, as these are vital areas that may require additional repair work during the restoration process.
Next, evaluate the engine and mechanical components. Check for any leaks, unusual noises, or performance issues. Inspect the condition of vital parts such as the carburetor, exhaust system, and transmission. Take note of any components that seem worn or require replacement, as these will factor into your project budget.
Don’t forget to assess the electrical system. Test the battery, wiring, and lights to ensure they are functioning properly. A malfunctioning electrical system can hinder your restoration efforts and affect the overall performance of the motorcycle.
Lastly, inspect the tires and brakes for wear and tear. Ensure that the tires have adequate tread and are free from cracks or bulges. Check the brake pads and disc for sufficient thickness and operational reliability. Safety should always be a top priority in any restoration project.
By following these tips for a thorough inspection, you will gain valuable insights into the condition of your motorcycle, enabling you to plan your restoration effectively and make informed decisions moving forward.
Essential Tools and Supplies for Your Garage Restoration Setup
Starting a motorcycle restoration project requires a well-equipped garage to facilitate efficient and effective work. The following tools and supplies are essential for a successful restoration experience.
Basic Hand Tools: Invest in a comprehensive set of hand tools, including wrenches, sockets, screwdrivers, and pliers. These are fundamental for disassembling and reassembling various motorcycle components. A torque wrench is also crucial for applying the correct force on bolts to avoid damage.
Power Tools: A good quality drill and a versatile grinder can save significant time and effort during the restoration project. An impact wrench can be invaluable for loosening stubborn bolts, while a bench grinder is helpful for refining metal parts and sharpening tools.
Specialized Motorcycle Tools: Certain tools are specifically designed for motorcycle maintenance and restoration. A motorcycle lift or stand will provide easier access to the bike for repairs and inspections. A chain alignment tool ensures proper alignment during reinstallation, and a carburetor cleaner can help with cleaning fuel systems.
Measuring Tools: Precision is key in restoration projects. Calipers, micrometers, and a tape measure should be in your arsenal to accurately measure components and ensure fits are correct. Additionally, a level can help ensure stability when reassembling the bike.
Supplies for Restoration: Stock up on various supplies such as lubricants, greases, sealants, and adhesives. Electrical tape and heat shrink tubing are essential for any wiring work you may encounter. Don’t forget to get a suitable collection of fasteners, including nuts, bolts, and screws, specific to your motorcycle model.
Cleaning Supplies: A clean workspace is vital for a successful restoration. Gather cleaning products tailored for motorcycle maintenance, such as degreasers, metal polish, and microfiber cloths. A parts washer can provide a deeper clean for intricate components.
Safety Gear: Prioritize safety by investing in personal protective equipment such as gloves, goggles, and a dust mask. Proper ventilation is also important when working with chemicals and paints, so consider a fan or exhaust system for air quality management.
Having the right tools and supplies for your motorcycle restoration project will not only streamline your workflow but also enhance the quality of your work. Equip your garage thoughtfully to set the foundation for a rewarding restoration experience.
Step-by-Step Process for Disassembling and Rebuilding Motorcycle Components
Embarking on a motorcycle restoration project in your garage requires a methodical approach, especially when it comes to disassembling and rebuilding various components. This process ensures not only the safety of the motorcycle but also the quality of the restoration. Below is a detailed step-by-step guide to help you through it.
1. Preparation
Before you begin, gather all necessary tools such as wrenches, screwdrivers, and pliers. Make sure your workspace in the garage is clean and organized. Label containers or bags for small parts to avoid loss during disassembly.
2. Document Your Process
Take photos or notes during the disassembly of each component. This will serve as a reference for rebuilding later. Pay attention to the order in which parts are removed, as this will simplify reassembly.
3. Start with the Body Panels
Remove the body panels first to access internal components easily. Use the appropriate screwdrivers to avoid stripping screws. Keep track of all fasteners, as they may differ for each panel.
4. Remove the Fuel Tank
Next, disconnect the fuel lines and electrical connections associated with the fuel tank. Carefully lift the tank off, ensuring not to damage adjacent parts. Store it safely for cleaning and painting later.
5. Disassemble the Engine
Once accessible, begin disassembling the engine. Start with removing the outer covers and then proceed to the internal components. Take care to follow the manufacturer’s specifications for torque settings and order of removal.
6. Inspect Components
As you disassemble, inspect each part for wear and damage. Make a list of components that need replacement or repair. This step is vital for ensuring the reliability of the motorcycle upon completion of the restoration.
7. Clean Each Part
Clean all disassembled parts thoroughly before rebuilding. Use appropriate cleaning agents to remove grease and grime. A clean surface will improve the reassembly process and help identify any issues.
8. Rebuild Components
Begin rebuilding by reversing the disassembly process. Refer to your documentation and photos to guide you. Use new gaskets, seals, and fasteners as needed, ensuring that everything is torqued to the manufacturer’s specifications.
9. Final Inspection
After reassembling, perform a thorough inspection of all components. Check fluid levels, connections, and ensure there are no loose parts. This step is crucial for a successful restoration and safe operation of the motorcycle.
10. Test Ride
After completing your restoration, take the motorcycle for a test ride in a safe area. Monitor its performance and address any issues that arise. This final step is essential to ensure everything works as it should.
By following this detailed guide, you can effectively disassemble and rebuild motorcycle components, leading to a successful restoration project in your garage.


