


Maintaining the braking system of your vehicle is crucial for safety, and one of the essential aspects of this maintenance is the brake fluid change. Over time, brake fluid can become contaminated with moisture and debris, leading to diminished performance and potentially dangerous situations. Whether you’re working on a motorcycle or a car, understanding when and how to replace brake fluid is vital for optimal operation.
This guide will walk you through the process of changing and bleeding brake fluid effectively, ensuring that your braking system remains responsive and reliable. Knowing the right type of fluid for your specific vehicle is the first step, as different vehicles may require different standards to be met. We will cover the tools needed, the steps to properly bleed the system, and signs that indicate it’s time to replace your brake fluid.
By following these guidelines, you can enhance the longevity of your braking system and ensure a safe riding experience. Regular maintenance, including brake fluid changes, is an investment in both your vehicle’s performance and your personal safety on the road.
Step-by-Step Process for Changing Brake Fluid in Motorcycles
Changing the brake fluid in motorcycles is essential for maintaining optimal braking performance. Follow these steps for a thorough fluid change.
Step 1: Gather Supplies
You will need new brake fluid (consult your owner’s manual for the correct type), a wrench, a clear plastic tube, a brake bleeder tool (optional), and a container to catch the old fluid.
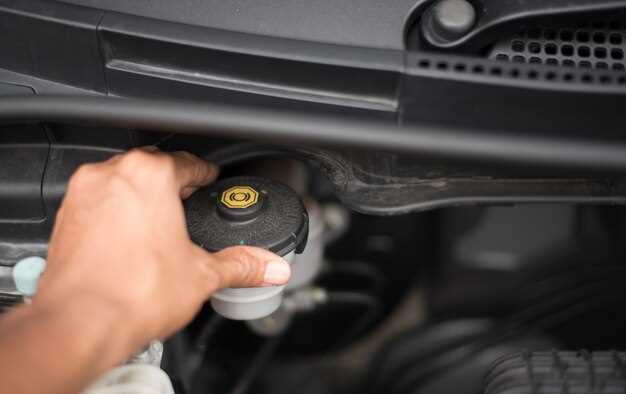
Step 2: Prepare the Motorcycle
Ensure the motorcycle is secured on a level surface. If necessary, place it on a center stand or paddock stand. Remove any components that obstruct access to the brake fluid reservoir.
Step 3: Remove the Brake Fluid Reservoir Cap
Locate the brake fluid reservoir, usually found near the handlebars or rear brake area. Carefully remove the cap, and clean around the opening to prevent any debris from entering the system.
Step 4: Extract Old Brake Fluid
Using a siphon or turkey baster, remove as much old fluid as possible from the reservoir. Dispose of the fluid in accordance with local regulations, as it is hazardous waste.
Step 5: Add New Brake Fluid
Pour new brake fluid into the reservoir, filling it up to the recommended level, which is typically marked inside the reservoir. Take care not to overfill.
Step 6: Bleed the Brakes
Attach the clear plastic tube to the bleeder valve on the brake caliper. Place the other end of the tube into a container. With a helper, have them pump the brake lever while you open the bleeder valve slightly to allow old fluid and air to escape. Close the valve before your helper releases the lever.
Step 7: Repeat Bleeding Process
Continue the bleeding process until you see a steady stream of new fluid without air bubbles in the tube. Ensure that the brake fluid reservoir remains topped up during this process to avoid introducing air back into the system.
Step 8: Final Checks
Once the brakes are fully bled, close the bleeder valve securely. Re-check the fluid level in the reservoir and adjust as necessary. Replace the reservoir cap, ensuring it’s properly sealed.
Step 9: Test the Brakes
Before riding, press the brake lever several times to ensure proper feel and function. Take the motorcycle for a short test ride in a safe area to verify braking effectiveness.
Step 10: Clean Up
Dispose of any used fluid properly and clean any spills immediately, as brake fluid can damage paint and surfaces. Store any leftover fluid according to safety guidelines.
Regularly changing and bleeding your motorcycle’s brake fluid is critical for safety. Maintain this practice to ensure reliable braking performance.
Identifying Symptoms Requiring Brake Bleeding in Your Vehicle
Proper brake function is essential for the safety of any vehicle, including motorcycles. Identifying symptoms that require brake bleeding can help ensure optimal performance and responsiveness.
One of the primary indicators of air in the brake system is a spongy or soft brake pedal. When pressing the pedal, it should feel firm and provide immediate feedback. If the pedal sinks to the floor or feels excessively soft, this may signal the need for brake bleeding to remove trapped air.
Another symptom to watch for is a decrease in braking efficiency. If your vehicle takes longer to stop or requires more pressure on the brake pedal, it may suggest that the brake fluid has absorbed moisture or that there is air in the brake lines. This condition warrants immediate attention.
Unusual noises during braking, such as grinding or squeaking, could also indicate issues unrelated to brake fluid but may prompt you to inspect the entire braking system. However, if these sounds are accompanied by the previously mentioned symptoms, it’s critical to check the fluid levels and consider bleeding the brakes.
Lastly, if you notice a drop in brake fluid levels or find fluid on the ground under your vehicle, this could signify a leak. In such cases, you may need to bleed the brakes after addressing the leak to ensure there is no air in the system and that the braking system operates effectively.
Choosing the Right Brake Fluid Type for Optimal Performance

Selecting the appropriate brake fluid is crucial for ensuring optimal performance and safety in your vehicle or motorcycle. Brake fluids come in various types, primarily classified by their chemical composition and properties. The most common types include DOT 3, DOT 4, and DOT 5, each suited to different braking systems and conditions.
DOT 3 and DOT 4 fluids are glycol-based and are widely used in most vehicles. They have a high boiling point, which is essential for preventing brake fade during heavy use. DOT 4 fluid offers a slightly higher boiling point than DOT 3, making it a better choice for performance vehicles or motorcycles that experience severe braking conditions. Always check your vehicle’s owner manual to determine the recommended fluid type and specifications.
On the other hand, DOT 5 fluid is silicone-based and does not absorb moisture, making it ideal for motorcycles. This characteristic reduces the risk of corrosion within the brake system. However, DOT 5 fluid is not compatible with glycol-based fluids, so it cannot be mixed. If you consider switching to DOT 5, ensure your entire brake system is completely flushed and cleaned of any previous fluid type.
When choosing brake fluid, also consider the temperature range and conditions in which you ride or drive. For instance, if your motorcycle is often used in high-performance scenarios or competitive environments, investing in high-quality DOT 4 fluid might provide the extra margin of safety you need. Always prioritize reliable brands known for producing fluids with consistent performance and quality standards.
Regularly checking and changing your brake fluid is essential. Over time, brake fluid can absorb moisture, lowering its boiling point and compromising braking efficiency. Be proactive in maintaining your vehicle’s or motorcycle’s braking system to ensure safety and optimal performance on the road.


