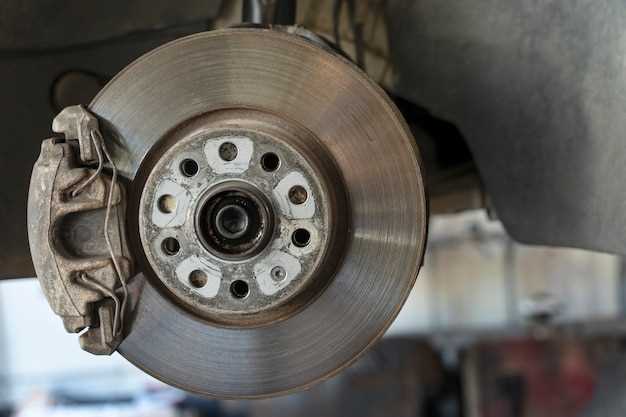
Replacing the disc rotors is a crucial maintenance task for ensuring optimal braking performance in your vehicle. Over time, rotors can experience wear and tear, leading to reduced effectiveness and safety issues. Understanding how to properly replace your disc rotors not only enhances your vehicle’s performance but also prolongs the lifespan of your braking system.
This guide provides a clear, step-by-step process for disc rotor replacement, ensuring that you can tackle this task with confidence. Whether you’re a seasoned mechanic or a DIY enthusiast, following these instructions will help you achieve the best possible results. Quality braking is essential for safe driving, making rotor maintenance an important aspect of vehicle care.
Throughout the process, we will emphasize the importance of using high-quality components and adhering to safety practices. With the right tools and a bit of preparation, you can ensure that your vehicle remains responsive and safe on the road, enhancing your driving experience and overall braking performance.
Choosing the Right Brake Rotors for Your Vehicle
When it comes to braking performance, selecting the right brake rotors is vital for ensuring safety and efficiency in your vehicle. The type of rotors you choose can significantly affect your braking capabilities and the overall driving experience.
Firstly, consider the material of the rotors. Common options include cast iron and carbon-ceramic. Cast iron rotors are widely used due to their durability and affordability, making them suitable for everyday use. On the other hand, carbon-ceramic rotors provide superior performance, especially in high-performance vehicles, offering excellent heat resistance and reduced weight.
Next, examine the rotor design. There are typically two types: vented and slotted. Vented rotors have internal cooling channels that help dissipate heat, while slotted rotors feature grooves designed to expel water and debris, enhancing grip and performance under various conditions. For performance-oriented applications, slotted or drilled rotors can improve stopping power and reduce brake fade.
It’s also essential to consider the size of the rotors. Larger rotors usually provide better braking force and improved heat management. However, ensure that the chosen rotor size is compatible with your vehicle’s specifications and brake calipers.
Finally, assess your driving habits. If you frequently engage in heavy braking, such as in off-road conditions or during sports driving, investing in high-performance rotors can lead to significant improvements in reliability and performance. For normal city driving, standard rotors may suffice.
In conclusion, choosing the right brake rotors involves evaluating various factors, including materials, designs, sizes, and your driving style. Making an informed decision will ensure optimal braking performance and enhance the overall safety of your vehicle.
Tools and Materials Needed for Successful Rotor Replacement

Replacing disc rotors is an essential aspect of maintaining an efficient braking system. To successfully complete this task, you will need specific tools and materials. Below is a comprehensive list to ensure a smooth rotor replacement process.
Tools:
- Basic Hand Tools: A socket set, wrenches, and screwdrivers will be necessary for removing the brake caliper and mounting hardware.
- Brake Caliper Tool: A brake caliper tool or C-clamp is essential for compressing the caliper piston to allow for new brake pads and rotors to fit.
- Torque Wrench: This tool is crucial for ensuring that the bolts are tightened to the manufacturer’s specifications, providing proper braking performance.
- Brake Rotor Removal Tool: Depending on your vehicle, a specialized rotor removal tool may be required to detach rotors easily.
- Jack and Jack Stands: A reliable jack is necessary to lift the vehicle safely, while jack stands will provide stability during the replacement process.
Materials:
- New Brake Rotors: Always use high-quality rotors compatible with your vehicle model for optimal braking efficiency.
- Brake Pads: It is advisable to replace the brake pads along with the rotors to maintain a balanced braking system.
- Brake Cleaner: This will help in cleaning the surfaces of the new rotors to remove any manufacturing residue that could impair braking performance.
- Anti-Seize Compound: Applying this compound to the hub surface can prevent the new rotors from sticking and make future changes easier.
- Brake Fluid: Checking the brake fluid level and replacing it if necessary is important for maintaining proper braking pressure.
Having the right tools and materials at hand will facilitate a successful rotor replacement, ensuring that your braking system operates effectively and safely.
Detailed Steps to Remove and Install Brake Rotors

Before starting the process, ensure you have the necessary tools: a jack, jack stands, lug wrench, brake cleaner, and a torque wrench. Additionally, gather replacement brake rotors and any required hardware.
1. Lift the Vehicle: Begin by securely parking the vehicle on a flat surface. Using the jack, lift the wheel you plan to work on and place jack stands underneath for safety.
2. Remove the Wheel: Use the lug wrench to loosen and remove the lug nuts from the wheel. Once free, take off the wheel and set it aside.
3. Remove the Brake Caliper: Locate the brake caliper, which houses the brake pads. Unscrew the caliper mounting bolts and gently slide the caliper off the rotor. Do not let the caliper hang by the brake line; support it with a bungee cord or hang it securely.
4. Remove the Brake Pads: Take out the brake pads from the caliper bracket. Inspect them for wear if you plan to replace or reuse them.
5. Remove the Caliper Bracket: If necessary, unbolt the caliper bracket to access the rotor. Keep track of all bolts for reinstallation.
6. Remove the Old Rotor: The rotor may be secured with screws or just fit snugly on the hub. If there are screws, remove them. If the rotor is stuck, gently tap it with a soft hammer to dislodge it.
7. Clean the Hub Surface: Before installing the new rotor, clean the hub surface to ensure proper contact and prevent rust buildup.
8. Install the New Rotor: Position the new rotor onto the hub, aligning it with any holes for screws, if applicable. Ensure it is seated properly.
9. Reattach the Caliper Bracket: If you removed the caliper bracket, reattach it securely to the mounting points using the original bolts. Torque them to the manufacturer’s specifications.
10. Install the Brake Pads: Place the brake pads back into the caliper bracket, ensuring they fit snugly against the rotor.
11. Reinstall the Brake Caliper: Slide the caliper back over the brake pads and rotor. Reinsert and tighten the caliper mounting bolts to specification.
12. Reattach the Wheel: Place the wheel back onto the hub and hand-tighten the lug nuts. Lower the vehicle back to the ground.
13. Torque the Lug Nuts: Once the vehicle is on the ground, use the torque wrench to tighten the lug nuts to the recommended specifications in a crisscross pattern.
14. Test the Braking System: Before driving, pump the brake pedal a few times to seat the brake pads against the new rotors. Check for any unusual noises or issues.
15. Repeat for Other Wheels: If replacing rotors on multiple wheels, repeat these steps for each wheel as necessary.


