


Keeping your ATV in optimal condition requires proper maintenance, and ensuring a reliable power source is essential. A battery tender plays a crucial role in maintaining the battery’s health, especially during periods of inactivity. By consistently charging the battery during storage, you can prevent issues related to battery drain and extend the lifespan of your essential components.
In this guide, we will walk you through the steps necessary to install a battery tender on your ATV. This simple yet effective device is designed to monitor and manage your battery’s charge, providing a steady flow of power during long storage periods. Following these instructions will not only save you time and potential headaches in the future but will also keep your ATV ready for any adventure.
Understanding how to properly connect and set up a battery tender is key for any ATV owner. Whether you ride frequently or just occasionally, avoiding battery-related issues will allow you to focus on enjoying your outdoor experiences without worrying about whether your vehicle will start. Let’s get started on ensuring your ATV’s battery is always ready to go.
Choosing the Right Battery Tender for Your ATV Model
When selecting a battery tender for your ATV, it’s crucial to consider the specific requirements of your model, including the type of battery and its capacity. Battery tenders, or maintainers, are designed to keep your battery topped off during storage periods, ensuring optimal performance.
First, identify the battery type in your ATV. Most ATVs use either lead-acid or lithium batteries. Each type has different charging needs. For instance, a lead-acid battery typically requires a tender that offers a slow charge to prevent overcharging, while lithium batteries need a model compatible with their distinctive chemistry.
Next, evaluate the voltage requirements. Most ATVs operate on 12-volt systems, so ensure the battery tender you choose matches this voltage. Additionally, check the amperage output of the tender. A unit with a lower amperage might take longer to charge but can safely maintain your battery without the risk of overheating.
Another important factor is the tender’s smart charging technology. Modern battery tenders often come with features like automatic shutoff and float modes, which prevent overcharging and extend battery life. Look for models that incorporate these features for better maintenance during storage.
Lastly, consider the environment where you will be using the battery tender. If your ATV is stored outdoors or in a damp environment, choose a model that offers weatherproof capabilities to ensure durability and safety.
In conclusion, by understanding your ATV’s battery type, voltage, amperage, and the tender’s features, you can select the right battery tender to keep your battery healthy and charged during storage periods.
Step-by-Step Installation Process for Battery Tender Connections
Begin by gathering all necessary tools and equipment, including your Battery Tender, a set of wrenches, and wire connectors. Ensure your ATV is parked on a level surface and the ignition is turned off to prevent any accidental starts.
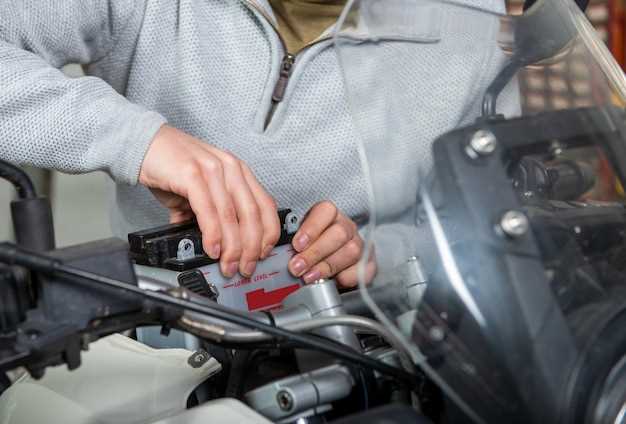
Next, open the seat or access panel of your ATV to locate the battery. Carefully remove the negative terminal first using a wrench, followed by the positive terminal. This step is crucial to avoid short circuits during the installation process.
Once the battery is exposed, clean the battery terminals with a wire brush to remove any corrosion. This will ensure a solid connection for optimal charging. After cleaning, attach the Battery Tender’s positive lead to the battery’s positive terminal and secure it tightly with a wrench.
Now, connect the negative lead of the Battery Tender to the battery’s negative terminal. Just like the positive connection, make sure it is snug and secure. If your model features ring connectors, you can attach them directly to the battery terminals.
For enhanced protection, consider routing the leads through the ATV’s body or framework to keep them away from moving parts and potential hazards. Ensure the wires are not pinched or stretched to prevent damage.
Once the connections are in place, double-check that everything is secured properly. Reattach the ATV’s seat or access panel. You are now ready to plug in the Battery Tender to a wall outlet.
Finally, monitor the charging process as indicated by the Battery Tender’s LED lights. Regular care and use of the Battery Tender will extend the life of your ATV’s battery, ensuring reliable performance when you need it.
Maintaining Your ATV’s Battery During Extended Storage Periods

Proper maintenance of your ATV’s battery is crucial, especially during prolonged storage. A neglected battery can lead to reduced performance and may even require replacement. Here are some essential tips to ensure your battery remains in optimal condition:
- Use a Battery Tender: Investing in a quality battery tender is one of the best ways to maintain your battery during storage. A tender will keep the battery charged at an appropriate level, preventing sulfation and extending its life.
- Clean Battery Terminals: Before storing your ATV, clean the battery terminals to remove any corrosion. Use a mixture of baking soda and water to scrub the terminals, ensuring a solid connection when you’re ready to use the ATV again.
- Check Water Levels: For lead-acid batteries, check the water levels before storage. Top them off with distilled water if necessary, as maintaining the correct water level is vital for battery health.
- Disconnect the Battery: If you plan to store your ATV for an extended period, disconnect the battery. This helps prevent any parasitic drain from the electrical components.
- Store in a Temperate Environment: Where you store your ATV matters. Keep the battery in a cool, dry place away from direct sunlight or extreme temperatures, as both can impact battery performance.
By following these care tips, you can ensure your ATV’s battery remains fully functional during extended storage periods, ready to perform when you return to the trails.


