


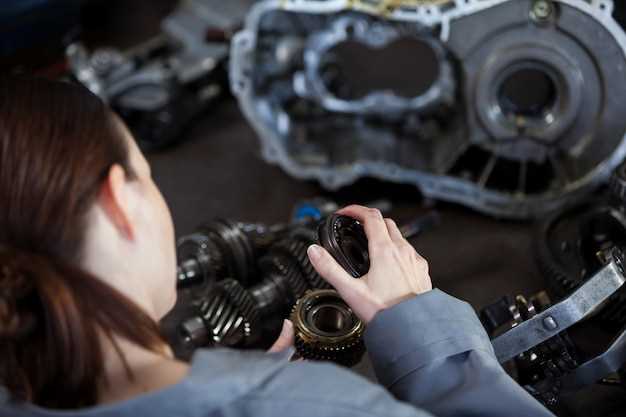
In the world of four-stroke engines, the proper adjustment of valve timing and clearance is essential for optimal performance and longevity. Each engine has specific tolerances that must be maintained to ensure that the valves open and close at the correct intervals, allowing for efficient combustion and power generation. Neglecting this critical maintenance task can lead to decreased engine efficiency, increased emissions, and potential damage over time.
Valve adjustment techniques can vary widely depending on the engine design and manufacturer recommendations. Understanding the specific needs of your engine is paramount. Typically, these adjustments are made by manipulating the rocker arm, pushrod, or valve lifter, depending on the type of valve train configuration. Each method requires precision and care to achieve the correct clearance, which is the space between the valve and its actuator when the valve is fully closed.
Moreover, improper timing can result in a host of issues, such as misfires, rough idling, and reduced power output. A well-timed engine allows for smoother operation and enhanced responsiveness, while the correct clearance ensures that the valves seat properly, reducing wear and tear. Thus, mastering valve adjustment techniques is not just a matter of following instructions; it is an art form that combines knowledge, skill, and attention to detail.
Understanding Valve Clearance Measurements in Four-Stroke Engines
Valve clearance, the gap between the valve stem and the rocker arm or the camshaft, plays a critical role in the performance and efficiency of four-stroke engines. Accurate measurements of this clearance are essential to ensure that valves open and close at the correct times, promoting optimal engine performance.
To measure valve clearance, technicians typically use feeler gauges, which are thin metal blades of varying thickness. The engine must be at a specific position, often the top dead center (TDC) of the compression stroke, to obtain correct readings. The right clearance varies by engine design; consequently, consulting the manufacturer’s specifications is vital.
Misadjusted valve clearance can lead to numerous issues, including poor engine performance, increased wear, and even engine failure. Insufficient clearance may cause valves to remain partially open, resulting in a loss of compression and power. Conversely, excessive clearance can lead to increased noise and vibration, as the valve train experiences undue stress.
Regular checks and adjustments of valve clearance are recommended as part of routine engine maintenance. This practice helps maintain the desired performance level, reduces the likelihood of engine damage, and extends the life of the components. Understanding and managing valve clearance is thus crucial for the longevity and reliability of four-stroke engines.
Step-by-Step Process for Adjusting Valve Timing
Adjusting valve timing is critical for optimizing engine performance and efficiency. Follow these steps to ensure precise valve timing in a four-stroke engine:
1. Gather Required Tools and Materials: Before starting, ensure you have the necessary tools, including a socket set, a feeler gauge, a torque wrench, and the engine’s service manual.
2. Prepare the Engine: Begin by disconnecting the battery and removing any components obstructing access to the valve cover. Clean the area to prevent contaminants from entering the engine.
3. Remove the Valve Cover: Carefully take off the valve cover, taking note of any gaskets or seals that may need replacement during reassembly.
4. Rotate the Engine: Use a socket on the crankshaft pulley to rotate the engine to the top dead center (TDC) of the compression stroke for cylinder one. This is crucial for accurate valve timing adjustments.
5. Check Timing Marks: Verify that the timing marks on the crankshaft and camshaft align correctly. Misalignment indicates the need for adjustment.
6. Inspect Valve Clearance: Using a feeler gauge, check the clearance between the valve stem and the rocker arm. Consult the service manual for the correct specifications.
7. Adjust Valve Clearance: If the clearance is outside the specified range, use the appropriate adjustment method–typically a screw or shim–to achieve the desired setting.
8. Recheck Timing Alignment: After making adjustments, recheck the timing marks to ensure proper alignment. If necessary, repeat the adjustment steps.
9. Reassemble Components: Once satisfactory adjustments are made, reinstall the valve cover, ensuring proper sealing with new gaskets if required. Reattach any components removed earlier.
10. Reconnect the Battery: Finally, reconnect the battery and start the engine to verify that it runs smoothly and that the valve timing is correctly adjusted.
By following this step-by-step process, you can efficiently adjust valve timing, enhancing your four-stroke engine’s performance and reliability.
Common Mistakes to Avoid During Valve Adjustment
One of the most frequent errors in valve adjustment is neglecting the proper clearance specification. Each engine has a specific clearance requirement that ensures optimal performance. A gap that is too tight can result in valve float, while excessive clearance can lead to noisy operation and reduced engine efficiency. Always refer to the manufacturer’s guidelines for the correct measurements.
Another common mistake is overlooking the timing of the engine during adjustment. Valve timing is crucial; if the engine is not at the correct position in its cycle, the adjustment will not be effective. Make sure that you turn the engine to the top dead center (TDC) of the compression stroke for accurate adjustment.
Many mechanics also fail to account for the thermal expansion of engine components. As the engine heats up, clearances can change. Performing adjustments when the engine is cold may lead to incorrect settings once it reaches operating temperature. Always consider the thermal effects on valve clearance.
Improper tools can also lead to issues during valve adjustment. Using the wrong feeler gauge can give inaccurate readings and lead to mistakes in setting the clearance. Investing in high-quality, precise tools is essential to avoid unnecessary complications.
Lastly, neglecting to double-check adjustments can be detrimental. After completing the valve adjustment, it’s important to recheck all clearances and ensure that they conform to specifications before reassembling the engine. This step can prevent future issues and ensure the longevity of the engine.


